The cost of heating the family home is a fixed cost that a lot of families just put up with, but these days a lot of homeowners are looking to find alternatives to heating and cooking at home. Building your own wood heater and wood stove could potentially save energy and money in the long run. Any investment you put into making the wood heaters and stove could pay off.
Are you ready to conserve energy and save money? There are plenty of ideas and plans that you can try if you want to make your own wood heater at home.
Options to Building Wood Heaters
The first step for making your own wood heater at home is to assemble all the materials you’ll need. For your DIY wood heat installation, you can recycle scrap materials so you won’t have to spend a ton of money to build your own heating system. If you were to spend on the materials, it would be quite minimal (especially if you have the tools needed to build one).
There are a variety of plans and ideas that you can try to build DIY wood heaters or stoves. Whether you want to heat your home or cook your food, the following ideas can be easily achieved even when you have no prior experience in making one. Get inspiration from these ideas on your next DIY project.
Option 1: Easy Homemade Wood Stove
Building your own wood stove does not have to be complicated. All you need is a steel or metal barrel. Using this material, you have to create an air inlet, along with a door and chimney. Once that is done, you must create legs for support for the wood stove or heater. You may use a pipe or any other material that is available for this.
Option 2: Using Old Gas Tank
Another efficient way to heat your home during winter is to create your own wood heater with an old gas tank. This material is readily available wherever you are so you should have no trouble finding them to use for this project.
In addition to an old gas tank, you will also need the following supplies and materials: 1 x 1 inch box (for the legs), fire cement, steel hinge, pipes, flat bar, and weld mesh. If you have a limited budget, this project is recommended for you. While some DIY wood heater installation costs can reach a thousands, this can be done with around a hundred dollars.
Option 3: Using a Water Tank
You can also create a portable wood heater at home with the use of a water tank. Follow these steps to make your DIY wood heater or stove:
- Cut the tank in order to create a door for the wood heater or stove. Make sure to secure the door using a chain.
- You can drill two or three holes (choose how many as desired). Always consider the chimney stack, pipe passage, and the air passage when determining how many holes to drill.
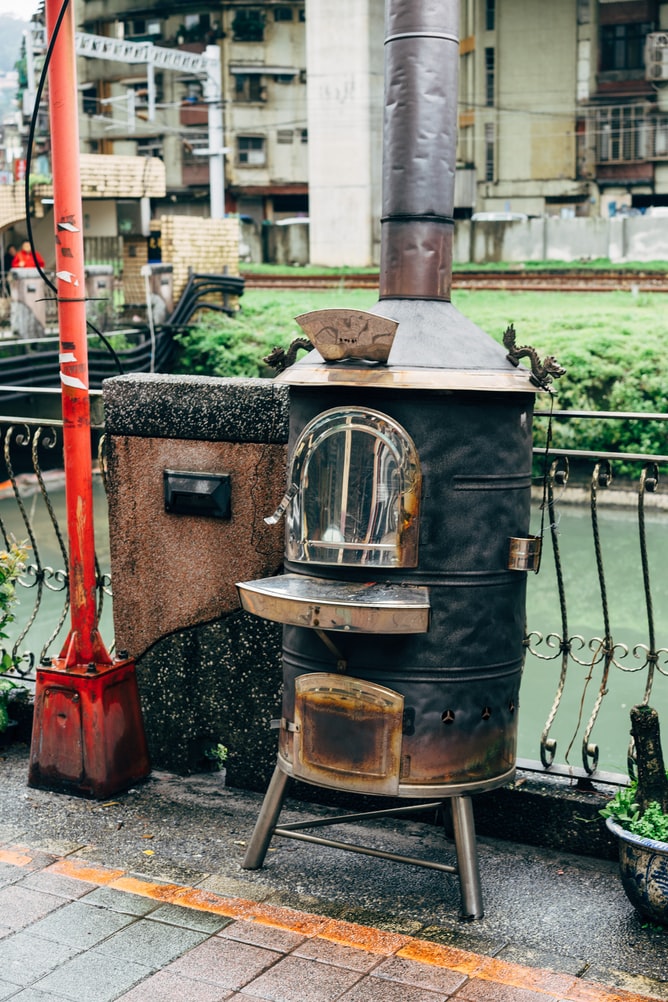
Option 4: Using a Steel Barrel
If you have any old steel barrel (or you can buy a new one for a cheap price), then you can use that to make your own wood heater or outdoor stove. This is a good option if you are looking to make a portable version.
This one requires no use of welding equipment. You only need a jigsaw, screwdriver, power drill, grinder, hammer, and a pair of pliers. If you have any of these tools readily available, then it would help you save more for this DIY wood heater or stove. You can opt to position the barrel in either vertical or horizontal position – it is up to you on how you intend to use it.
Before building your wood heater or stove, make sure to thoroughly clean out the barrel. This will help to eliminate any remnants of what the barrel once contained and for your own safety, too.
Option 5: Using an Old Paint Can
If you need to make a portable wood stove or you need to heat a small section of your house, you can also try making your own with a used paint can. This is one of the simplest ways to build a DIY wood heating system that costs almost nothing to make (given that you have the tools available at your disposal).
You need to cut the bottom of the can with a safety cutter. Drill holes on top of the can and another series of holes at the base of the inner can. This will allow air to travel into the can and up the side of the walls of the can. You can then add a hardware mesh fire grate to the bottom of the can but slightly above the holes at the base. This wood heating installation is great for smaller heating jobs or for portable use such as when you are camping.
Tips to Make Wood Heater Efficient
Energy- and cost-efficiency are two of the most compelling benefits of building your own wood heater at home. You can take note of these tips to increase the efficiency of its use.
- Keep your wood heater and stove clean at all times. A clean wood heater can produce heat more efficiently. If you use it daily, clean it more often.
- Choose the location of your wood heater wisely. This is something to consider if you need heating for the winter. Make sure it is close to the zone where you spend most of your time to allow for more efficient heating.
- Keep the wood heater at least 36 inches away from any combustible material. This includes doors, walls, and other types of furniture. You can also use a heat shield if you are unable to space it out. The idea is to allow a good amount of air circulation between the heater and any combustible material.
- Know the right type of wood to use for heating. Different types of wood can provide different levels of heating. Hardwoods produce more heat but softwood is cheaper and has a cleaner burn.
The cost of buying pre-made wood heaters or stoves are quite expensive. This cost can go up or down depending on the type of assembly, type of materials, customization, and other basic installation expenses. Building your own is a great way to save money and conserve energy in the long run (since you no longer have to rely on fuel or gas for heating your home or cooking).


